Photography Basics: Exposure Triangle
by Brad Monnerjahn
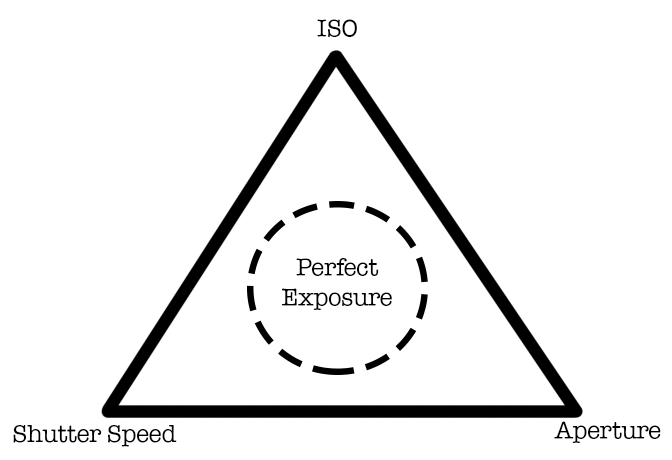
Exposure is basically the amount of light allowed through the lens to create a photograph. The 3 components of exposure are shutter speed, aperture, and ISO which collectively make up what we call the “exposure triangle.” All modern cameras have an automatic or auto mode allowing the camera itself to determine the correct combination of these 3 variables in order to get the “correct” exposure. To really master the art of photography, you’re going to want to learn to shoot in manual mode, where you choose your own exposure settings. I use quotations around “correct” because you, the photographer (the artist) will need to determine what is indeed correct. We’ll visit this topic a bit further in a future entry. For now, let’s learn about each of these 3 components separately.
First off there’s shutter speed. This is the simplest to understand. When you click the shutter button your camera snaps a picture. What actually happens is the shutter, which was previously blocking light from hitting the sensor, momentarily moves (opens), exposing the sensor to light before it returns to the closed position. The speed of this opening/closing determines how long light is allowed to bathe the sensor. So a brighter scene will require a much shorter duration of light bathing the sensor than a darker scene. Below you will see the same picture with all settings the same except for shutter speed (Left: 1/2000 second)(Right: 1/250 second).


The second component of the exposure triangle is aperture which is the size of the opening allowing light through the lens and is expressed as a unit called F-stop or f. A smaller aperture has a higher number, like say f16, whereas a larger aperture is represented by a smaller number for example f1.8. A smaller aperture lets in more light due to the larger diameter of the opening, but it also results in shallower depth of field or less of the photo in focus (more on depth of field in a separate article). The opposite is true for smaller aperture; less light and more depth of field.


Above I have 7 blocks set up at 2-inch intervals. Both photos are exposed identically. The left is shot an aperture f 16 whereas the right side is f 2.8. ISO is the same (1600) for both and I used shutter speed to adjust for desired exposure. You can easily see a smaller aperture, in this case f 16, creates a much deeper depth of field versus a larger aperture such as the above 2.8 where only the first block is fully in focus and each successive block is blurrier than the previous one.
Lastly is ISO which simply put is the sensitivity of the camera sensor. ISO 100 is typically the smallest setting on most cameras and is less sensitive. Sensor quality differs from model to model, but ISO settings top out around 6400 and above. The higher your ISO setting the more sensitive your sensor, but also the noisier your resulting photo. When we talk about noise in the photograph we’re referring to the pixelation or graininess of the photo. Have you ever taken a picture on your smart phone at night or in a dark room? You may have noticed the photo appears grainy, especially if you zoom into the picture. Smart phones mostly shoot in automatic mode and will adjust your smart phone’s ISO to a higher setting for low-light situations.


Above are again 2 identical pictures. This time I used the same aperture for both (f 7.1) and used shutter speed to achieve desired exposure. ISO for the first photograph is 100, my camera’s lowest setting. It’s a very clean picture in terms of pixel noise. The second photograph, however, was shot at ISO 25,600, my camera’s highest setting. You can see a definite difference in pixel noise, especially in the darker colors. The noise is not usually a problem unless you plan on creating large prints of your photo; the bigger the print the worse the noise (like when you zoom in on your smart phone picture from above discussion).
So, now that we have a basic understanding of the camera and the different settings for exposure, how do we put it all together?
Example 1:
It’s a nice, sunny day. You want to photograph the landscape. My first decision here is to set my ISO to 100 or 200. There’s plenty of available daylight and I want the cleanest picture I can get with minimal pixel noise. Second, usually if you’re shooting a landscape you want as much of the scene sharp and in focus as possible, so I’d tend to choose a higher f-stop. So let’s just say f 16, although there are other factors to consider depending on the quality of your lens. So, ISO 100, f 16, now what? Well, your landscape isn’t going to get up and run away as would be the case if you were photographing a 2-year old child. Therefore we can afford to use a slower shutter speed to achieve the desired exposure.
Example 2:
Okay, now the 2-year old monster, I mean child… lol. Let’s still assume a nice, bright day and we’re shooting outside at the local park. My first priority here would be the shutter speed. You’ll need to play around with your settings to figure out exactly how fast you’ll need the shutter speed so you can get a clear, in-focus shot. I’m just going to say 1/250 of a second for this example. Next your aperture which will depend on focal length, distance to background, and desired look for this portrait. More on these things in a later lesson. Anyway, let’s try f 8 for this example. I want my subject to be fully in focus and as we learned a higher f-stop will give me a greater depth of field. So if I focus on the child’s eyes I should get his entire face in focus. If I tried a wide open aperture like f 1.8, then I might, if I’m lucky, get the eyes in focus, but the nose and ears will be blurry. Okay, lastly in this example I’d choose ISO. I want as low a setting as possible, but even if I need to change it to 800 or 1600 that should be plenty good enough for prints.
I started writing this intending to explain a few relatively simple concepts, but I’m afraid I dove into a rabbit hole. That’s part of what I love about photography, though. I started off just wanting to shoot the sunrise, and lesson after lesson, and shoot after shoot, I continued to be amazed at how much I still had to learn about it. Heck, I’m still learning new techniques and concepts and I’ve been at it now for about 5 years! Hopefully, this won’t scare anyone away from photography, but inspire you to keep taking steps toward mastering the art.
Until next time…


